How to change your motorcycle oil

One of the greatest joys for an enthusiast is to be able to take care of his own motorcycle. It can be simple things like giving your bike a wash or a complicated procedure like a full service. Changing your motorcycle’s oil is one of the most basic and easiest maintenance procedures that you can start off with. Here is a step-by-step guide.
The first thing you need to do is go through your motorcycle’s user manual and jot down details about the change interval and grade of oil. Chances are that the manual will also contain a detailed explanation and illustrations of how to change the oil. In essence, the basic steps are the same, irrespective of which bike you ride. All you need to do is have the right tools (which are usually provided in the bike’s tool kit) and follow these steps –
1. Find the correct oil
Check the manual for the grade and amount of oil that needs to be filled; in case of the TVS Star City Plus it was 10W/30 and one litre.

2. Drain the oil
Let the motorcycle idle for a couple of minutes to heat the oil. This will reduce its viscosity, which will allow it to drain easily. Get your motorcycle on its centre stand and place a tray below the oil sump to collect the used oil. Use the appropriate spanner to remove the drain bolt, which is usually the biggest bolt located at the bottom.

In case the bike doesn’t have a main stand, hold the bike upright to allow the oil to drain completely. Avoid direct contact with the oil as it might burn your hands.

3. Put back the drain bolt
Clean the bolt before putting it back. Once the oil has been drained completely, which can take anywhere between five to ten minutes, put the drain bolt back in and tighten it sufficiently.

4. Open the engine oil cap
Put the oil tray away from the working area, to avoid accidental spillage. The oil cap is located on the right side of the bike, above the crankcase. Unscrew the oil cap and store it carefully. Clean the area around the engine oil cap.

5. Fill new oil
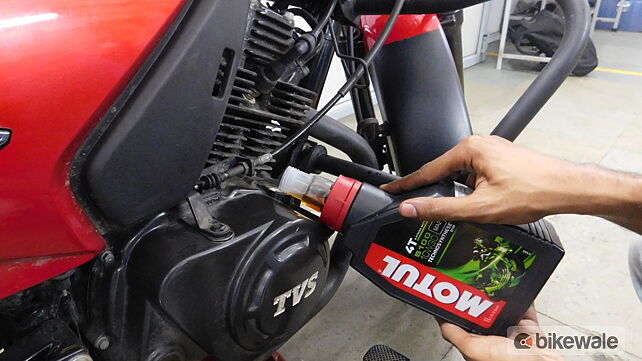
Ideally, your motorcycle should be upright while you fill the oil to help you gauge the oil level on the dip stick or the oil level check window (located on the crank case) correctly. The Motul engine oil that we used had a neck extender to make it easy to pour. Otherwise, you can use a funnel. Once done, wipe the oil cap clean and screw it back on.

6. Double check all the bolts
Tighten the drain bolt and oil cap securely. Start up the motorcycle and let it idle for a while. Check for leaks. Remember to dispose of the used oil responsibly, as it is hazardous waste. Any automotive garage should be able to help you with this.

Photography by Omkar Thakur
Click here to read How to clean and oil your chain
Click here to read How to install a USB charger
Click here to read How to install helmet bluetooth communication system
Gallery
1/9
Double Tap to Zoom


