Resonate ChargePlus USB charger Review
A couple of weeks ago, we introduced the Resonate ChargePlus motorcycle USB charger to you. You can read about it here. It’s a handy and well-built little thing that is a great add-on for those who love to tour on bikes or use mobile phones with really poor battery life. But, how does it go on to a motorcycle? Is it a convenient DIY? Does it require any major modifications to install? We’ve answered them all here.

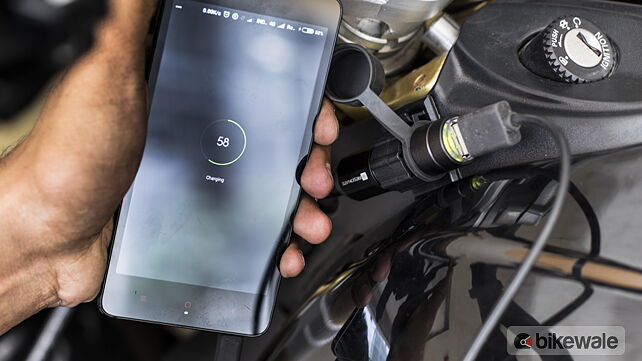
The ChargePlus connects to the 12V DC output terminals on your motorcycle battery and gives a 5V output on the adapter. This output is more than enough to offer the flexibility to charge tablets, action cameras, GPS devices, WiFi hotspot dongles and power banks in addition to mobile phones. Given that the ChargePlus has been designed keeping easy installation in mind, all we needed was a portable multi tool kit to get the charger plugged in.
1. Find a suitable spot to affix the mount
We decided to mount the Resonate ChargePlus near the ignition key of our Mahindra Mojo long term motorcycle. This spot provided us a flat surface to stick the 3M sticky holders for the charging device. The location also helps conceal the charger as a safeguard against miscreants when the handlebar is locked. While we are installing the ChargePlus on the Mojo, your motorcycle will offer different possibilities to install the charger.

Hunt for a spot which won't restrict you from placing your device in a single position. Ideally, the charger should be placed such that it allows you to affix your device on the handlebar mount or inside your tank storage flap. In case you are installing the mount on the handlebar, just make sure you're going to have enough clearance with the full steering lock on either side.

2.Route the cables to the battery
First, identify the location of your motorcycle’s battery and find a way to route the cable to the battery. We managed to pass the wire from under the fuel tank without removing it, concealing the cabling in the process. Don’t rush into this step. Have a good look at your motorcycle, give it some thought, and only then proceed.

3. Crimp the ring terminals
The packaging comes with two ring terminals, which can be affixed on the ends of wires. First strip down the jacket to expose the wire, using the cable splicer provided as a part of the package. Insert the bare wire into the terminal until the exposed bit meets the metal part of the terminal, and then use a crimper or simply a pair of pliers to crimp the insulated part.

This not only makes it easy to connect the wires to the battery, but also makes the entire arrangement safer. This not only makes it easy to connect the wires to the battery, but also makes the entire arrangement safer.

4.Connect the terminals to the battery
Moving on to the battery, first unscrew the two terminals. Place the ring terminal over the screw of the battery and tighten the setup as it was. Red is positive and black is negative. As a thumb rule, always start with the negative terminal first, while unscrewing the terminals, and attach the positive terminal first while connecting the wires to the battery. Needless to say, keep your motorcycle's ignition turned off during this entire procedure. Now, here’s the smart thing about the ChargePlus. Even if you mix up the positive and negative terminals while attaching, it won’t have any adverse effect.

5. Tidy up the cabling
As we mentioned in our first report, the cable is quite long (3 metres, to be precise). In case it is left loose (which it will be), the excess wire might interfere with the internals of the motorcycle and cause complications. So, it is advisable to wind up the cable and secure it in a place using one of the zip ties. Not only does it give the entire arrangement a tidier look, but it also makes it easy to access the battery.

And that’s how you install the ChargePlus onto your bike. Now with this USB charger ready to use, next time, we will bring you a detailed report on the working, performance and the shortcomings, if any, of the Resonate ChargePlus. Stay tuned to BikeWale.

Photography by Kapil Angane
Gallery
1/11
Double Tap to Zoom


